Parallax trix
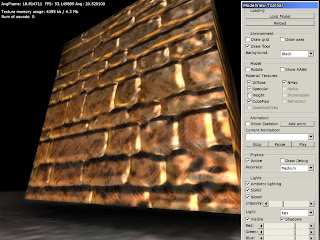
Since many seemed to enjoy the parallax mapping showed off in the material editor, I just wanted to show off the more advanced way of doing it and also giving some explanations.
No Parallax
 This is when no parallax effect is added, just boring and flat. What happens is that the engine simple interpolates the uv-coordinate (the position on the texture map) according to the vertices (the points) of the model.
Offset Parallax

This technique is really just a cheap trick and as seen in the picture it fails at steep angles. Despite this, as the material editor video showed, it still gives a good effect in most cases! The way it works is by adding an offset to the uv coordinate depending on the height of the height map and of the angle of the eye (compared to position of the pixel). The biggest problem with this is that a pixel can never occlude (be in front of) another.
Relief mapping
 This algorithm is a lot more accurate than offset mapping, but also a lot more expensive. This is no longer a cheap trick and works by casting a ray from the position of the eye and into the height map. It is then computed where the ray first hit something and the uv coordinate of that point is used. This sort of ray casting is used in all advanced parallax techniques, but is implemented differently. In relief mapping, one first steps along the ray at certain intervals and looks for an intersection. When one is found a binary search is used between the intersection and the eye position to pin point the exact intersection point. The binary search means that the distance between eye and the first found position is halved over and over, locking in on the intersection.
Other techniques such a cone step mapping give even better results but require the height map to be set up with certain extra data that is calculated before the rendering starts. There are also techniques for letting the height map not only occlude itself but also the other objects in the scene. It can even carve the actual model to better fit the height map, see "Relief Maps with Silhouttes" here for an example. This really takes the technique to new heights (ha..ha...) and it is really cool how much can be done with what starts out as a flat surface!
No Parallax
 This is when no parallax effect is added, just boring and flat. What happens is that the engine simple interpolates the uv-coordinate (the position on the texture map) according to the vertices (the points) of the model.
Offset Parallax

This technique is really just a cheap trick and as seen in the picture it fails at steep angles. Despite this, as the material editor video showed, it still gives a good effect in most cases! The way it works is by adding an offset to the uv coordinate depending on the height of the height map and of the angle of the eye (compared to position of the pixel). The biggest problem with this is that a pixel can never occlude (be in front of) another.
Relief mapping
 This algorithm is a lot more accurate than offset mapping, but also a lot more expensive. This is no longer a cheap trick and works by casting a ray from the position of the eye and into the height map. It is then computed where the ray first hit something and the uv coordinate of that point is used. This sort of ray casting is used in all advanced parallax techniques, but is implemented differently. In relief mapping, one first steps along the ray at certain intervals and looks for an intersection. When one is found a binary search is used between the intersection and the eye position to pin point the exact intersection point. The binary search means that the distance between eye and the first found position is halved over and over, locking in on the intersection.
Other techniques such a cone step mapping give even better results but require the height map to be set up with certain extra data that is calculated before the rendering starts. There are also techniques for letting the height map not only occlude itself but also the other objects in the scene. It can even carve the actual model to better fit the height map, see "Relief Maps with Silhouttes" here for an example. This really takes the technique to new heights (ha..ha...) and it is really cool how much can be done with what starts out as a flat surface!


Comments
Post a Comment